Photographing lakes isn’t just about pointing your camera at the water.
It’s about understanding light, movement, reflections, and composition—then using those elements to create emotion through imagery.
Whether you're shooting with a phone or a DSLR, lakes offer a powerful blend of stillness and surprise that, when captured well, can make your photos stand out. Here’s how to do it with precision and purpose!
Timing Isn't Just About Light—It's About Silence
The most photogenic lakes often reveal themselves before the world fully wakes. Arrive about 30 minutes before sunrise. This window gives you access to glassy reflections, low wind conditions, and gentle, even lighting. If you're lucky, cooler mornings after warmer nights can produce layers of mist that roll quietly across the surface.
While sunsets can offer rich colors, the wind tends to pick up later in the day. If you're shooting in the evening, check the wind forecast in advance—anything under 5 km/h is ideal.
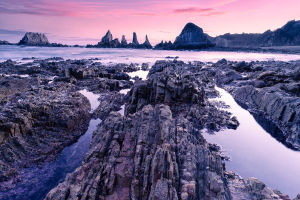
Think Wide, But Stay Low
Lakes stretch out horizontally, which means a wide-angle lens will help capture the natural layout. But it's not just about width—your height matters. Lowering your tripod or crouching near the edge brings foreground elements like rocks, branches, or reeds into play. This builds depth and gives your photo a sense of presence. Don't overlook the textures near the shoreline. Wet leaves, floating petals, or cracked mud can all be small but powerful details that anchor your shot.
Reflections Need Direction
It’s tempting to chase perfect mirror images in the water, but not every reflection tells a strong story. Use reflections with intention. For clean symmetry, place the horizon at the center of your frame—but don’t do it out of habit. Sometimes it’s better to offset the horizon if the sky is more dramatic or if the foreground deserves more attention. Keep your camera level and double-check the lines. A slanted lake horizon is rarely artistic—it just looks unfinished.
Polarizers Reveal and Hide, Depending on Your Choice
A polarizing filter is your silent partner in lake photography. It allows you to decide what the viewer sees—reflections on the surface or the textures below. Adjust the angle as you shoot. Turn the polarizer one way and watch clouds vanish, turn it the other way and submerged rocks come to life. This tool is especially helpful when shooting during midday, when glare is strongest. Be aware, though: polarizers reduce light, so your exposure settings will need adjusting.
Use ND Filters for Texture Control
Neutral density filters give you creative control over motion and light. They allow longer exposure times even during daylight, which transforms choppy water into smooth glass or adds a soft, misty quality to flowing elements. Start with a 6-stop filter to handle most daytime lake scenes. Set your shutter speed between 10 and 30 seconds to create that silky effect. A tripod and remote shutter release are musts—any vibration will blur your results.
Include the Unexpected in the Frame
Lakes are more than scenery—they're part of an environment. Including details like a boat, a person fishing, or a bird in flight can introduce scale and story. Wait for the right moment. A bird flying low over the water or a canoe drifting into the golden light adds movement to an otherwise still scene. Use a fast shutter speed—1/1000s or faster—for moving subjects if you want them sharp. Or go the opposite direction and blur them for mood.
Weather Isn’t a Problem—It’s an Advantage
Clear blue skies might be pleasant to hike under, but they’re often dull in a photo. Look for cloud movement, approaching storms, or soft overcast conditions. These add mood, texture, and emotion to your image. Dark, heavy skies? Switch to black-and-white mode and embrace the contrast. The drama of storm clouds over a quiet lake is worth capturing in its full weight.
Don’t Let the Drone Do All the Work
Aerial shots of lakes can be breathtaking, but they need structure. Don’t just fly straight up and shoot down—tilt the camera to include banks, curves, and transitions between water and land. Study the shoreline and plan your composition before takeoff. Adjust exposure manually. Water from above tends to reflect harsh light, often confusing auto settings and overexposing key areas.
Lake photography isn't about speed or trend—it’s about focus. You’re capturing a landscape that breathes slowly. The water, the trees, the clouds—none of them rush. The best images come from a photographer who notices what others overlook. So next time you're by a lake, look closely. Let your frame fill with silence, stillness, and story!